
Installing Mavericks: What you need to know
Before Lion (OS X 10.7) debuted in 2011, installing the latest major version of Mac OS X meant buying a disc and slipping it into your Mac’s optical drive. But Lion changed all that by making OS X available for direct download, and Mountain Lion (OS X 10.8) and Mavericks (OS X 10.9) have inherited this distribution method. More specifically, the latest version of OS X is available only as a download from Apple’s Mac App Store—and this time around, it’sfree. This makes it easier and more convenient to upgrade your OS than having to buy and use a DVD or thumb drive, but it also raises a number of questions, and it presents upgrade obstacles for some users. As I’ve done the past few years, I’ve compiled this guide to getting and installing Apple’s latest OS.
Before proceeding, be sure to read my article on getting your Mac ready for Mavericks, which covers system requirements and recommendations, as well as a number of tasks you should perform before upgrading in order to help the process go smoothly.
Fair warning: If you install Mavericks right when it’s released, keep in mind that you’re installing version 1.0 of a major new OS. It could be bug-free, but if the history of OS X is any indication, we’ll see the first update, containing a number of bug fixes, within a few weeks. If downtime isn’t an option for you, you might consider holding off for the inevitable OS X 10.9.1.
Downloading Mavericks
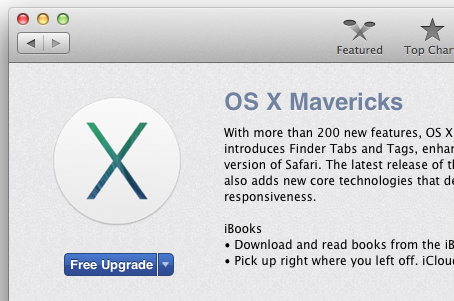
Assuming your Mac meets the requirements, getting Mavericks is easy—for most people (more on that below). You simply launch the Mac App Store application, click the OS X Mavericks banner on the store’s main page (or search for Mavericks, or click this direct link), click the Free Upgrade button at the top of the screen, and then click the Install App button that appears.
After you provide your Apple ID and password, Mavericks will begin downloading. Specifically, the 5.3GB installer application, called Install OS X Mavericks.app, will be saved to your main Applications folder (
/Applications) and, if you’re upgrading from Mountain Lion or Lion, added to Launchpad. The installer will likely even automatically launch after it finishes downloading. On my cable-model connection the day of Mavericks's release, the download took 28 minutes.
Note that as with Mountain Lion, updates to Mavericks will be provided through the Mac App Store app. In fact, if you choose Software Update from the Apple Menu under Mavericks, the Mac App Store app launches. (In Lion and earlier versions of OS X, that Apple Menu command instead launched the older Software Update utility.)
Downloading the installer onto other Macs: Once you’ve downloaded Mavericks to one of your Macs, you can download the installer to any of your other 10.9-capable Macs by simply logging in to your Mac App Store account, finding Mavericks in your Purchases list, and clicking the Download button to the right. (Just like applications purchased from the store, a single “purchase” of Mavericks lets you install it on all your personal Macs.)
Copying the Mavericks installer onto other Macs: Alternatively, once you’ve downloaded the Mavericks installer to one computer, you can copy it—over your local network or by using a flash drive, external hard drive, or other media—to your other Macs. This is obviously a much faster approach than re-downloading the 5.3GB installer to each computer. You won’t even be prompted to authorize the installer on each Mac, as you are with other Mac App Store-distributed software—the Mavericks installer does not use digital-rights management (DRM).
Downloading the installer onto a Mac already running Mavericks: If you already have Mavericks—either the official release or the golden master (the final developer release, a.k.a., the GM)—installed on a Mac, you may have problems downloading the final-version installer onto that Mac. The Mac App Store app may think you already have the installer and, thus, not offer to let you download it again. (This was a common issue with Lion, although much less so with Mountain Lion and Mavericks, but I mention it here just in case.) If this happens to you, launch the Mac App Store app and Option+click the Purchases tab in the toolbar; that should show the Download button next to Mavericks in the Purchases list. If that doesn’t work, Option+click Mavericks in the list and then Option+click the Installed button on the Mavericks page. One of these two methods should let you download the installer.
Similarly, if you're a developer who previously downloaded the golden master (GM) of the Mountain Lion installer, the Mac App Store app may claim that Mavericks is already installed on your Mac—and thus not let you download the official release—if the Mac App Store app detects the GM installer on any connected volume. (Again, this happened frequently with the Lion installer, but less so with Mountain Lion and Mavericks.) If this happens to you, the solution is either to delete the GM installer (after compressing it or copying it to a removable drive if you want to keep it handy) or, if possible, to disconnect the drive on which the GM resides.
Keeping the installer on hand
Before proceeding with installation, here’s an important tip: If you run the installer from its default location in the Applications folder, the installation process deletes the installer, presumably to free up the 5.3GB of drive space it occupies. So if, as explained above, you plan to use the installer on other Macs, if you want to create a bootable installer drive, or if you just want to keep the installer on hand, before installing, you should copy the installer to another drive—or at least move it out of the Applications folder.
Installing Mavericks
Unlike versions of OS X prior to Lion (OS X 10.7), Mavericks offers only a single installation option: where to install the new OS. In fact, you don’t need to make any decisions until it’s time to set things up and start using your Mac. You don’t even need to boot from a different disc or volume—the Mavericks installer runs as a standard application.
Once you’ve downloaded the Mavericks installer, here are the simple steps involved in installing the new OS:
- Double-click the Install OS X Mavericks app; in the window that appears, click Continue, and then click Agree (twice) to agree to the Mavericks software license.
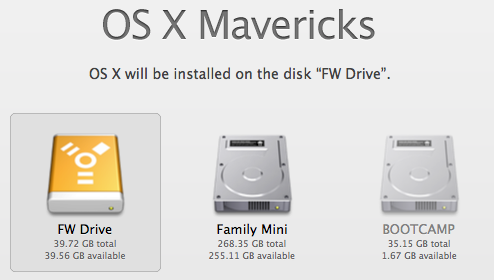
- On the next screen, you choose where to install the OS. By default, only your internal startup drive is listed; if you have other drives connected and want to install Mavericks onto one of them, click the Show All Disks button and then choose the desired drive. Note that the installer lets you choose any drive that has OS X 10.6.8 or later installed or any blank drive. (The latter is what you would choose if you wanted to do a “clean” install that contains none of your data, applications, or settings from your current installation of OS X.) Of course, the destination drive must also be formatted as Mac OS Extended (Journaled) and use a GUID Partition Table; the built-in drive on any Mac eligible to run Mavericks should meet these requirements. (See my article on clean-installing Mavericks to help you decide if it's something you want to do. Also, we have instructions for installing Mavericks over Leopard (OS X 10.5), assuming you have the right to do so.)
- Click Install, and then provide an admin-level username and password when prompted.
- The installer spends some time preparing for installation. Over my many test installations on a number of different Mac models, this process rarely took more than a couple minutes, and on newer Macs took as little as 20 seconds. A message in the installer window explains that your computer will restart automatically; you can continue to work in other applications during this time, but once the preparation phase is finished, you get only a 30-second warning, and then your Mac will indeed restart on its own.
- After your Mac restarts, the actual installation occurs. (If you’re upgrading from Lion or Mountain Lion, and you have FileVault 2 enabled, you’ll need to provide an authorized username and password to bypass the FileVault lock screen at startup. Once you do, installation will continue normally.) During my test installs, the installation took anywhere from 15 to 74 minutes, depending on the Mac.
- When installation finishes, your Mac automatically restarts to complete the installation process. On my Macs, this final phase took roughly five to ten minutes. Once it finishes, your Mac proceeds to boot into Mavericks.
That’s the entire installation process—as with the Lion and Mountain Lion installers, you don’t need to choose between various kinds of installs, pick from a list of language translations or printer drivers, or make other potentially confusing choices that may or may not affect how your Mac functions.
That’s not to say that there’s nothing else to do, however. Your Mac will next go through the initial-setup process, and there are few tasks you’ll want to perform when you boot into Mavericks for the first time.
Initial setup: Accounts, Apple IDs, and iCloud
When the installation procedure finishes, what you see depends on whether you’ve installed Mavericks on an empty drive; or on a drive containing Mountain Lion, Lion, or Snow Leopard with existing accounts, settings, and data.
Mountain Lion: If you’ve upgraded from Mountain Lion (or installed Mavericks onto a blank drive and imported your data and settings from a Mountain Lion installation), the first thing you’ll see when you log in to your account under Mavericks depends on whether or not you were already using iCloud under Mountain Lion. If you were, you're prompted to enter the password for your Apple ID. If you weren’t, you're first prompted to provide an Apple ID or password; if you don’t have one, you have the option to create an Apple ID. Once you’re signed in, OS X asks if you want to use Find My Mac for this Mac, and then you’re prompted to agree to Apple’s terms and conditions (for OS X, privacy policy, iCloud, and Game Center). Click Agree (twice), and setup continues. (Whether or not you were set up to use iCloud under Mountain Lion, the first Apple ID screen gives you the option, via a tiny text link, to use different Apple IDs for iCloud and iTunes, if you don’t use the same account for both.)
In either case, the final step is to decide if you want to set up Mavericks’s new iCloud Keychain feature. Assuming you do, you’ll be walked through the setup process. Once that task is complete, you should be able to get right to work with no further interruptions.
Lion: If you’ve upgraded from Lion (or installed Mavericks onto a blank drive and imported your Lion data and settings), the procedure is essentially the same as with Mountain Lion. Oddly, on one of our Lion-equipped test Macs, we weren't prompted on the first restart to provide our Apple ID; it was only on the second restart that we were prompted. I suspect this was simply a glitch.
Snow Leopard: If you’ve upgraded from Snow Leopard (or installed Mavericks onto a blank drive and imported your Snow Leopard data and settings), the first thing you’ll see when you log in to your account under Mavericks is an Apple ID screen. Enter your Apple ID and password—you can create an Apple ID here if you don’t have one. (You have the option, via a tiny text link on this screen, to use different Apple IDs for iCloud and iTunes, if you don’t use the same account for both.) Once you’re signed in, OS X asks if you want to use Find My Mac for this Mac, and then you’re prompted to agree to Apple’s terms and conditions (for OS X, privacy policy, iCloud, and Game Center). Click Agree (twice), and you can start using Mavericks.
Empty drive: If you installed Mavericks onto a blank drive, your Mac will automatically restart with that drive as the startup drive. You’ll then be walked through the new-system setup procedure. First you choose a system language and keyboard layout. Next, you choose a Wi-Fi network and provide the network password. (If you're connected to an Ethernet network, you skip this step.) You’re then asked if you want to transfer accounts and data from another Mac, a Time Machine backup, another startup drive (such as a bootable clone backup), or a Windows PC; or you can simply start from scratch. If you do choose to transfer data, you’ll be given the option to choose what to transfer—most likely, you’ll want to transfer everything. The setup procedure will then continue much as if you upgraded from Mountain Lion, Lion, or Snow Leopard, respectively.
If you choose not to transfer data—so you’re essentially starting fresh—you’ll be asked to enter your Apple ID and password; if you don’t have one, you have the option to create an Apple ID. (If you use a separate Apple ID for iCloud and iTunes, you can click the little link here to enter them separately.) Once you’re signed in, OS X asks if you want to use Find My Mac for this Mac. You’re then prompted to agree to Apple’s terms and conditions (for OS X, privacy policy, iCloud, and Game Center); click Agree twice to continue. You then need to create a user account and password, configure a few options for that account, choose your time zone, and choose whether or not to allow OS X to automatically set the time. The final step is to decide if you want to set up Mavericks’s new iCloud Keychain feature. Assuming you do, you’ll be walked through the setup process. Once that task is complete, you're asked if you want to register your Mac, and after a brief Setting Up Your Mac screen, you can get to work.

Initial setup: Warnings and alerts
Incompatible software warning: If you upgraded a Snow Leopard, Lion, or Mountain Lion Mac, the first time you boot into Mavericks you may see a dialog box informing you that some of the existing software on your Mac is incompatible with the new OS, and listing that software. (Apple provides more information about such software in a support article.) You’ll usually see this message if you had kernel extensions—low-level software that patches the operating system itself—installed under your previous OS X installation that Apple specifically knows won’t work with Mavericks. It’s also possible to see the incompatible-software dialog box if you installed Mavericks onto a blank drive and then transferred data from another Mac or drive, but it’s less likely—OS X’s Migration Assistant generally doesn’t import kernel extensions and similar software responsible for low-level processes. In either case, OS X automatically moves this incompatible software to a folder called Incompatible Software at the root level of your startup drive.
Access prompts: If you have any apps or menu extras that launch at login that require access to your calendars, reminders, or contacts—for example, a third-party calendar app—the first time you log in under Mavericks, you're prompted to approve that access. (In versions of OS X prior to Mavericks, apps could access this data without needing your explicit approval.) Click OK to approve, or Don't Allow to decline.

Similarly, if you use any third-party utilities that take advantage of OS X's Assistive Devices features to, say, control windows or automate tasks, the first time you launch those utilities, each will prompt you to approve this access in the Accessibility screen of System Preferences' Security & Privacy pane. To allow access, check the box next to each app in the list here. (If a utility hasn't yet been updated for Mavericks, it may prompt you to instead open the Accessibility preference pane, and it may even open that pane for you. You'll need to switch to the Security & Privacy pane, instead.)
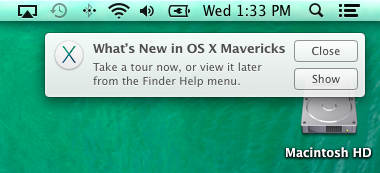
What’s New?: Finally, the first time you boot into Mavericks, you'll notice a Notification Center alert offering to show you some of OS X 10.9's new features. Click Show to take the tour in your Web browser. (If you don't want to take the tour now, you can always take it later by choosing What's New In OS X Mavericks from the Finder's Help menu.)
Post-Mavericks tasks
Once you’re up and running in Mavericks, you’re almost done. You may find, despite your pre-installation checks, that some of your existing software needs updates. Similarly, if you’ve performed a “clean” install of Mavericks (onto a blank drive without transferring accounts and data), you’ll need to spend a bit of time setting things up, and you'll want to reinstall all your favorite apps.
Check (again) for updates: The first thing you’ll want to do is choose Software Update (from the Apple menu) to open the Mac App Store app and install any pending OS updates. If you’ve installed Mavericks in the first few days of availability, chances are you won’t have any updates waiting (especially if you checked for updates to Mountain Lion, Lion, or Snow Leopard immediately before upgrading, so you already have the latest updates to other Apple software), but it can’t hurt to be sure. And if you’ve waited a week or more to install Mavericks, there’s a good chance Apple will have released a minor update—or will sometime soon.
Even if no updates to Mavericks itself are available, you may find that, after installing OS X 10.9, a firmware update is available for your Mac. For example, when Mountain Lion was released last year, Mac laptops required a firmware update to support Mountain Lion’s Power Nap feature, and this firmware update appeared only afterinstalling Mountain Lion (presumably because the firmware update wasn’t necessary under Lion or Snow Leopard).
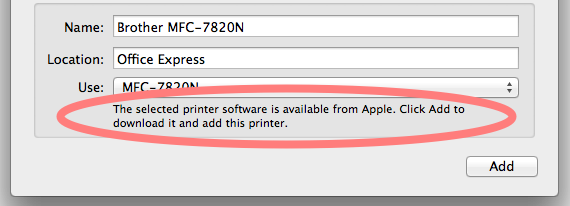
Set up printers, if necessary: If you didn’t upgrade from an already-configured installation of Mountain Lion, Lion, or Snow Leopard, you’ll want to set up your printer(s). As with OS X 10.8, 10.7, and 10.6, Mavericks doesn’t include many printer drivers in its base installation. Rather, when you set up a printer, the OS determines which drivers you need and, if necessary, either downloads them automatically or helps you get them. Open the Printers & Scanners pane of System Preferences and click the Add (+) button, and you’ll see a list of connected and nearby (Bonjour) printers. Choose one, and OS X will see if drivers are available. If your Mac already has the drivers installed, OS X will set it up immediately; if you don’t yet have the drivers, you see a message that you can download the software and add the printer.
Check for incompatible software and, if necessary, install apps: Next, if you saw the aforementioned incompatible-software dialog, now’s a good time to check the contents of the Incompatible Software folder at the root level of your startup drive, and then check each vendor’s website for updated versions of that software. Similarly, if you performed a clean install (installed Mavericks onto a blank drive and didn’t transfer accounts, applications, and data), it's time to reinstall your apps. Just make sure you’ve got the latest versions, as well as the latest updates (from vendor websites) to software you install from CDs and DVDs.
Note that, as with Mountain Lion, the first time you try to load a webpage or run an app that requires Java, Mavericks will prompt you to download and install the Java runtime, even if you already had Java installed under the previous version of OS X. This is normal—you shouldn’t worry that installing Mavericks somehow “lost” any of your data or apps.
Enable FileVault: If you want to use FileVault, OS X’s disk-encryption feature, but it’s not enabled—either because you’ve never used it or because you upgraded from Snow Leopard and followed my advice to disable it before upgrading—now’s the time to turn it on, via the Security & Privacy pane of System Preferences. Note that if the Mavericks installer (or the Mountain Lion or Lion installer before it) was not able tocreate a Recovery HD partition on your drive, you won't be able to enable FileVault.
Upgrade and installation challenges
For most people, Mavericks—like the two versions of OS X before it—is easy enough to get and easy to install. But, also as with Mountain Lion and Lion, upgrading to OS X 10.9 presents challenges for a few groups of people.
People with Mavericks-compatible Macs who are still using Leopard (OS X 10.5): There are a few Mac models that originally shipped with OS X 10.5 and are compatible with Mavericks. I’m certain there are a good number of those Macs still running Leopard, and many of them will likely stay that way—if someone has been happily running 10.5 for five or six years, and never felt the need to install OS X 10.6, 10.7, or 10.8, I doubt they’ll be running out to install OS X 10.9.
That said, what if you’re one of the people who’s still using Leopard, and you’ve finally been convinced to upgrade? Or what if you want to start fresh by installing Leopard and then upgrading to Mavericks? Can you jump directly from 10.5 to 10.9? Apple’s official policy is that you need to purchase and install Snow Leopard (currently $20 for a single-user license or $30 for a family pack) and then upgrade to Mavericks.
Indeed, the Mavericks installer is strict about requiring OS X 10.6.8: The installer application itself will launch under Leopard, but it won’t let you install Mavericks, either over Leopard or onto a bare drive. Nor can you mount a Leopard drive on a Mac running Snow Leopard, Lion, or Mountain Lion and then install 10.9—the installer simply refuses to install over Leopard.
But what if you own a copy of Snow Leopard for the Mac in question, but you don’t want to add an hour or two to the installation process by installing Snow Leopard first? We’ve published the instructions for installing Mavericks over Leopard. It’s not a simple procedure, but it works.
People with slow or limited-bandwidth Internet connections: If your Internet connection is slow, it will take a long time—perhaps days—to download the 5.3GB Mavericks installer. Even worse, if your ISP enforces caps on your Internet-data usage, you could end up paying a hefty price for the privilege.
If you’ve got a Mac laptop, you can instead tote it to your favorite Apple retailer, the library, a friend’s house, or the office—anywhere with a fast Internet connection—and download the installer there. In fact, for the past couple OS X releases (Mountain Lion and Lion), Apple’s official policy was to invite you to your local Apple Store and use the store’s Internet connection to download the installer; store employees would even walk you through the purchase, download, and installation processes. I suspect that will continue to be the case with Mavericks.
Of course, if your Mac doesn’t happen to be portable, or if you live in an area where you can’t borrow a fast, cheap Internet connection, you'll need to find another solution. If you’ve got an Apple Store nearby, you may be able to take a portable hard drive or an 8GB-or-larger thumb drive to the store and ask to purchase and download the installer on one of the store’s Macs. Similarly, you could borrow a friend’s computer, or—if you’re lucky enough to have a Mac at the office—use your work computer to download Mavericks.
(When Lion was released, Apple made available a $69 bootable flash drive containing the Lion installer. Unfortunately, the company didn’t do the same for Mountain Lion last year, and I don’t expect Apple to provide such an option for Mavericks, either.)
Businesses, schools, and other organizations and institutions that need to install Mavericks on many different computers: When Lion (the first version version of OS X to be download-only) was released, we heard concerns from large installations—schools, businesses, and the like—about the Mac App Store-only distribution. These organizations often need to roll out new versions of OS X to many Macs, and forcing each user to download and install Lion presented significant technical, logistical, and support issues. Mavericks presents the same challenges. Apple’s volume licensing information webpage explains the options: Organizations will use the same purchasing procedure as always to buy OS X, but they’ll be given one Mavericks redemption code for each purchase contract. After using that code to download the Mavericks installer from the Mac App Store, that copy of the installer can be used on any and all Macs covered by the contract.
To do so, Apple says customers can copy the OS X installer to the
/Applicationsfolder on each Mac and then run the installer from there, or they can create a NetInstall or NetRestore image, or use Apple Remote Desktop.
Apple doesn’t specifically suggest this, but an alternative is to create one or more bootable Mavericks-install drives and then install the OS on multiple computers using those.
Purring along
While researching this series of articles, I installed many, many copies of OS X 10.9 on a variety of Macs. As with Mountain Lion and Lion, my experience has been that for the typical Mac user with a broadband connection, the process of purchasing, obtaining, and installing OS X continues to be easy and pain-free. Still, heeding the advice above will reduce the chances of problems and make the upgrade go as smoothly as possible. Once you’re up and running, check out all our articles about the new OS, which cover its features, built-in apps, and more.
(For an even more in-depth look at upgrading to Mavericks, check out Macworldsenior contributor Joe Kissell’s Take Control of Upgrading to Mavericks, which covers such topics as extensive pre-install diagnostics, clean installs, installation troubleshooting, and much more. And see our complete installation guide for how-tos on using OS X Recovery, creating a bootable install drive, performing a clean install, and installing Mavericks over Leopard.)
Soratemplates is a blogger resources site is a provider of high quality blogger template with premium looking layout and robust design
0 comments:
Post a Comment