##Google Analz## ##Microsoft## ##Googel## Swanand: December 2013

Saturday 28 December 2013

How Can I Connect Two Windows 8 Machines with Wi-Fi Direct?

Want your Windows 8 devices to effortlessly talk to each other? Maybe you should try Wi-Fi Direct, a new wireless standard that does away with access points. Wi-Fi Direct is an emerging technology, and it's still a little buggy-so the experts at Stack Exchange are here to help.


I noticed I have a Wi-Fi Direct network adapter in Device Manager. I did a bit of research and it provides peer-to-peer communication between two devices using Wi-Fi. I researched how to transfer files between two Windows 8 laptops, but got no results. This article was the closest thing I could find, yet it doesn't totally explain how to send a file from computer A to computer B using Wi-Fi Direct. Why can't I find anything about file transfers, etc.? How can I use Wi-Fi Direct? Do I need third party software to send files?

Option 1
 The simplest way is to run a Wireless Hotspot (Personal Hotspot) on an Android, Blackberry, or iPhone, and connect both your computers to that same Wireless network.

Option 2
Another way is to simply run a network cable between the two. (No need for a cross-over cable on modern computers.)

Option 3
Ad-Hoc mode , which is simple to set up on Windows XP or Windows 7 but no other operating systems.

Now the "Fun" Part
Generally, there is no universal or fool-proof way to transfer files between PC's. Here are your options:
  • Windows file sharing. Right click on a folder and choose "Share". Many, many issues.
  • FTP Server and client
  • Skype (If you're on the same LAN it won't use your internet bandwidth!)
How?

Wi-Fi Direct Is Still In Its Infancy
The technology of Wi-Fi Direct is still new and has not yet matured in Windows 8. If your network card is made by Intel and is compatible, you can install Intel My Wi-Fi Dashboard to enable WiFi-Direct. This should (theoretically) already have been installed on your computer together with the network driver. If it's not available on your computer, I advise you to download from Intel and install the full driver package for your network card. If still unavailable, you can try to download the stand-alone package from Intel at Intel My WiFi Dashboard Software for Windows 8.
You probably just want to transfer data or files between the two PC's, right? Believe it or not, the sad truth is that the most fool-proof way is to use a flash disc, removable harddrive, or a service such as Skype, Dropbox, or email, for which you don't need any connection other than an internet conneciton. The benefits to a direct Wi-Fi connection is, of course, that it won't eat your bandwidth. (But that's different from the Wi-Fi Direct protocol!)
The simplest way is to run a Wireless Hotspot (Personal Hotspot) on an Android, Blackberry, or iPhone, and connect both your computers to that same Wireless network.
Another way is to simply run a network cable between the two. (No need for a cross-over cable on modern computers.)
Ad-Hoc mode , which is simple to set up on Windows XP or Windows 7 but no other operating systems.
Generally, there is no universal or fool-proof way to transfer files between PC's. Here are your options:
Each computer on a network has it's own "internet phone number" called an IP address. From Windows you can usually find other computers without knowing these addresses by simply browsing the "Network Neighborhood" or "Homegroup." Sometimes this freezes up or doesn't work, so on Windows, plan B is generally to click the start menu, and then the IP-address-of-other-pc, for example: 192.168.1.100. This will either open up the shared folders on that PC or it will prompt you for a username and password for an account on that PC. Google for "Find my LAN IP address."
LAN is important here, as it's your local address, not your internet address which the internet sees! Think of an internal extension vs. your direct (inward) dial (or DID) phone number. So technically you have two IP addresses: your LAN IP address and your internet IP address. If you're using FTP or a web server, you generally enter the IP address of the host (server) PC in your FTP client or web browser, to access the files hosted there.
Wi-Fi direct is a special protocol which probably won't see PC support due to innumerable technicalities. You'll be lucky if you get it to work between two devices from different vendors. And yes, it will take special software and some more years to mature. Microsoft obviously included it to compete with Samsung on mobile devices. But it really is a pointless protocol IMHO.
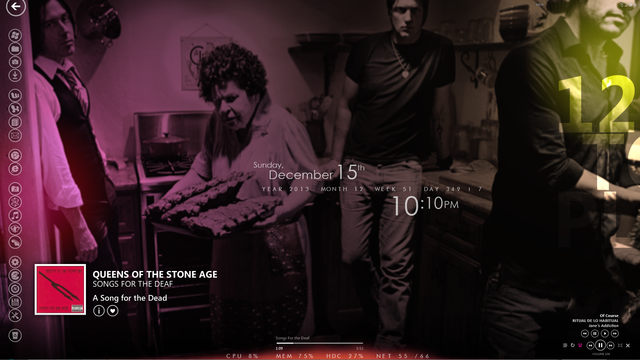
The Zune Tribute Desktop


Marios loves the Zune Music software about as much as we do, so he decided to build this custom desktop as a tribute. Not only does it have the same good looks, it also helps him get things done. Here's how he set it up.
Marios' submitted his desktop to our Desktop Showcase, which is what you should do if you want to see it featured here. All you have to do is post a screenshot to your Kinja blog (the one that came with your commenter account), and include links to the wallpaper, widgets, skins, and tools you used to customize it.
His desktop isn't just a tribute to the Zune software (which Marios notes is still his favorite music player), but also to his favorite band, Queens of the Stone Age. If you want the same look, regardless of who your favorite band is, here's what you'll need to put it all together:
Marios notes that he has a number of other wallpapers that shuffle over the course of the day, rotating out every few minutes. He even has a Flickr gallery of them if you're interested.
This setup is pretty straight forward, but we like the way he incorporated the Zune player's visual style into the whole thing. If you have any questions, want to give Marios a thumbs up, or just want to let him know you like the desktop, head over to his Kinja blog to say hello.
Do you have a good-looking, functional desktop of your own to show off? Share it with us! Post it to your personal Kinja blog using the tag desktop showcase or add it to ourLifehacker Desktop Show and Tell Flickr pool. Screenshots must be at least at least 640x360 and please include information about what you used, links to your wallpaper, skins, and themes, and any other relevant details. If your awesome desktop catches our eye, you might get featured!

How to Install SteamOS on Your Computer


SteamOS has finally dropped in all its beta glory. If you were one of the lucky 300 people who got some hardware to play with, you're all set. The rest of us, however, have to install it on our own machines. Here's how to do that.
Before we begin, there are some very important caveats:
  • This will wipe your machine. Due to the way Valve has distributed this image, you cannot partition a hard drive or dual boot it with your existing set up. This is a recovery image and your partition table will be wiped clean if you attempt to install it on the same hard drive. If you want to play around with it in a non-destructive manner, you can try it in a virtual machine. Once you've got SteamOS installed, you can create a new Windows partition, but this will wipe your existing setup.
  • This may wipe your secondary hard drives, too. The basic method is not optimized for installing on systems with multiple drives. Depending on how your boot tables are set up, you might inadvertently lose data on your other drives as well. Be safe and remove all hard drives except the one you want to install SteamOS on.
  • You'll need an NVIDIA graphics card. Sorry AMD users. Support is reportedly coming in the future, but for now if you don't have an NVIDIA graphics card, you'll have to sit this one out.

What You'll Need

How to Install SteamOS on Your Computer
Before you get started, here's what you'll need to download and/or collect:
There are two main ways to install SteamOS and which method you use will determine which download you need. The easiest method involves flashing a recovery disc image and that download is about 2.4GB (called "SYSRESTORE.zip" at the link above). The slightly more complicated method which has all the fun expert buttons is about 960MB and labeled "SteamOSInstaller.zip".

Method #1: The Easy Way

How to Install SteamOS on Your Computer
The simplest method to get SteamOS up and running is to install the recovery image. Again, as a reminder, this method will completely erase your entire hard drive regardless of partitioning. As long as you're prepared for that, here's what to d
  1. Format the USB stick to FAT32. Name it "SYSRESTORE".
  2. Unzip SYSRESTORE.zip and place its contents on the USB drive.
  3. Boot your machine from the USB stick.
  4. While booting, select the UEFI entry from the boot menu.
  5. Select "Restore Entire Disk."
This method will result in a complete, ready-to-use SteamOS installation being created on your machine. If you want to dual boot SteamOS with a Windows installation, you can set that up now. While this is based on Debian, our guide to dual booting Windows and Ubuntu can at least help point you in the right direction.

Method #2: The Advanced, Flexible Way

How to Install SteamOS on Your Computer
If you're feeling more adventurous (or want to minimize how much you have to download directly from Steam), you can use the secondary method. There are two primary differences between this method and the previous one. For starters, the download is significantly smaller. Part of the reason for this is because once you install the OS, you still need to download Steam. What you're installing is mostly just a customized version of Debian.
More importantly, though, this method has an Expert Install mode. You can use this method to tweak a few settings. That being said, if you're not extremely experienced with Linux distributions and installs, you probably shouldn't mess with this.
To install SteamOS via this method, follow these steps:
  1. Unzip the smaller, SteamOSInstaller.zip file to your USB stick.
  2. Boot your machine from the USB stick.
  3. Select the UEFI entry from the boot menu.
  4. Select "Automated Install."
  5. Once the install is finished, boot into the OS. You will be faced with a login screen. There is a default account with both the username and password are "steam". Log in with these credentials.
  6. Double-click the Steam icon on the desktop to download and install Steam.
  7. After this, you can log in to SteamOS via the login menu you used in step 5 (select "SteamOS" via the dropdown box) with the same credentials.
If you'd like to maintain the Debian installation and log in to SteamOS only when you need it, you can simply end here. However, if you'd like to commit all the way, follow Valve's instructions here from step 8 in the final section onward to make the final customization tweaks so that the partition is 100% Steam.

Method #2.5: A Note on Virtualization

How to Install SteamOS on Your Computer
Okay, so you've gotten this far and you're still not sure you want to take the plunge. That's fair. SteamOS is still a beta and it requires a fairly big commitment. If you'd still like to give it a shot, you can install SteamOS in VirtualBox. If you don't already have VirtualBox setup, our guide here will get you started.
The process for creating a virtualized SteamOS machine is a bit more complicated than the installs above, but this guide can walk you through the process fairly well. It builds on method #2 above, though instead of a USB installation, you'll create an ISO out of the installer. Keep in mind, though, that running SteamOS inside a virtual machine will probably result in some pretty poor performance and almost certainly won't be good for real gaming. This method is probably best for the idly curious who would just like to fiddle (and aren't content to play around with Big Picture and call it good).

Featured post

Vicidial With WebRTC

Vicidial With WebRTC VICIDial is well known open source call center software. It has been in use by many small to large scaled con...